blue shaker cabinet with Dixie Belle silkscreen stencil
- Isaac Klein

- Jan 7, 2021
- 4 min read
Updated: Mar 10, 2023
This primitive yet charming blue shaker cabinet belongs to one of my local clients. She asked two things for the makeover... (1) for it to be blue and white and (2) for the inside of the doors to be painted as she leaves it propped open.

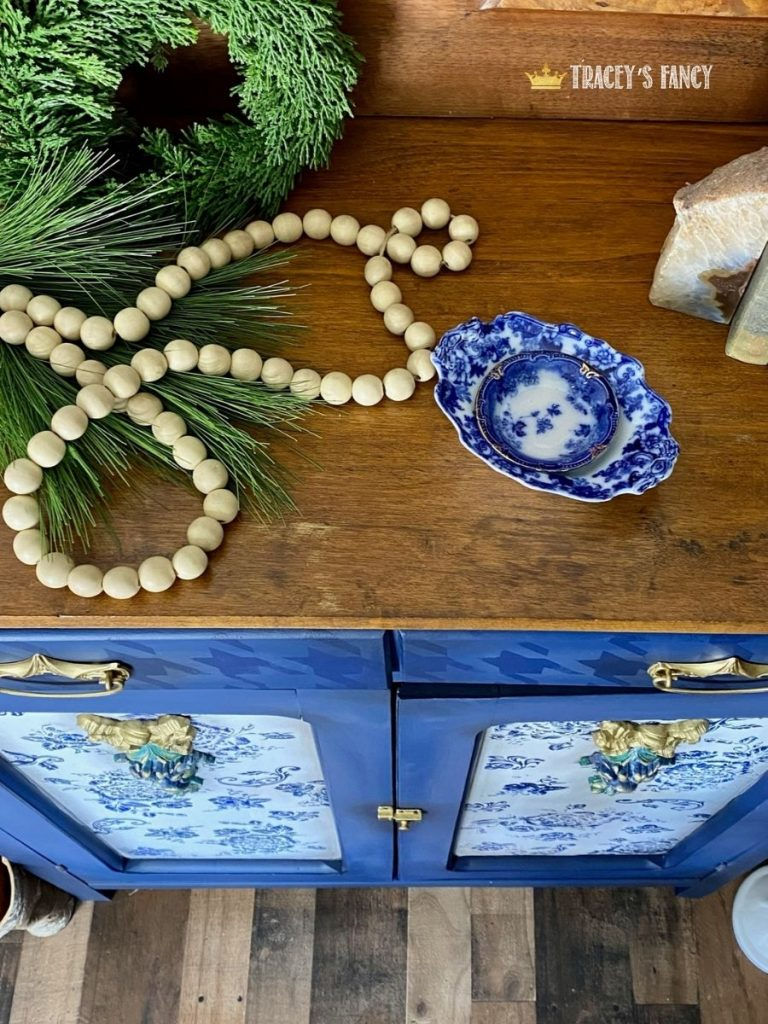
She also left me with a few small pieces of "flo blue" dishware that will be displayed near the cabinet to help me in choosing the blue tones for the piece.

I began by priming the entire piece in Dixie Belle's gray Boss...as I wasn't sure where I'd be using white....and I had no doubt that this old cabinet would bleed right through my white paint. It's always better to be safe than sorry.

Now....I could go into detail at this point about how I painted the cabinet in a blend of three blues on live video.....but I'll not waste your time. I woke up the next morning and didn't care for it at all.....so I completely painted over it!
What you see here is the final finish and I LOVE it!

The recessed areas of the doors are painted in the brightest and most pure white that Dixie Belle offers....Cotton. I usually prefer the softer version of white called Fluff. But in comparing my client's dishware to the piece...the white needed to be a china/dishware white...and Cotton was perfect.

The very detailed roses and other painted designs that you see within the recess were created with the new silkscreen stencils by Dixie Belle.
This floral silkscreen stencil is the very first silkscreen stencil I've used and I am more than impressed. I can't believe the fine line detail you can achieve with these things. And better yet....they are reusable many times!! I did both sets of doors with the same stencil!
I believe there are seven designs....and each design comes with three sheets! See all the silkscreen options here. The stencils work with paints and paste.....and you simply scrape the paint over the stencil with the provided spatula.....which gently pushes the paint through a very fine screen......while the surrounding stencil is adhered with its sticky side down on your project.....leaving no room for any bleed through. It's crisp and amazing!
I then chose a pair of WoodUBend (WUB1726) garlands of bows and roses for focal points of each door panel. I prepainted them in greens and blues and accented with gold. I followed the WUB protocol of heating with my heatgun...applying glue to backside....pressing into place....applying light pressure and a bit more heat....and done! They look as if they were always there!

I sealed the recessed panels with DB Satin Top Coat and let them dry. I then used Best Dang Wax in black to shade around the edges and corners and even around the roses and bow mold centerpieces. I just brushed the wax on with a chip brush and wiped it back with a dry cloth.
The color of the body of this piece gave me fits! I don't have an exact formula but I can tell you it is a chaotic mix of Bunker Hill Blue, Yankee Blue, and even touches of Cobalt Blue. I even did a final blend around the base with In The Navy. Most of the blending took place ON the piece and not on a paper plate like usual. I used a lot of water and just kept going until it looked right. And then I stepped away!
I lighten the two upper drawers with more of the Yankee Blue....so the "custom mix blue" could be used as a tone-on-tone stencil. I've used this houndstooth stencil so many times now and I can't get enough of it!
See my green Bombay dresser for another look created with my fave houndstooth stencil.
I chose to leave the top natural.....as it matches the inside of the cabinet and my client will prop the doors open to display her quilt collection. I actually used the houndstooth stencil on the inside of the doors in the same colors as the two small drawers.

I freshened up the original hardware with the new Gemstone Mousse in gold. I applied it with a brush and let dry for 24 hours. I then just used a spray can of clear topcoat to seal it.
I used the new Gilding Wax in gold with my finger....to accent the WUB roses/bow molds just to turn up the vintage shimmer volume a bit.
I sealed the entire piece in two coats of Top Coat Satin.
You can see by the photo here that the "flo blue" plateware pairs beautifully with this finish! I love how I was able to "play" and pull from my stash of goodies....paints, silkscreens, molds, stencils, waxes, mousse......it was a lot of fun to create!

I hope you'll be inspired to create from what you have.....and maybe even add a new item or two to your painting toolbox! I'm going to vote on silk screens....you really should give them a try if you haven't already!
More Blue Painted Furniture Inspiration
Click on any picture below for a full blog with product descriptions and additional photos.
Shop: Blue Shaker Cabinet
The products listed here are what I used for this blue shaker cabinet! Dixie Belle Paint company offers amazing products that will make all of your projects successful no matter what your skill level! Just click on any of the products shown below! You can also find my favorite products and tools in my Amazon influencer list here.
Here's how it works...these products are attached to my name. When you purchase by clicking from my blog.....then Dixie Belle offers a kickback to me for referring you! It doesn't cost you any more to use my links....and the support helps me to bring you new projects! So I thank you in advance!!!
See you next week!
XOXO,
Tracey

Please share my blue shaker cabinet pins and follow me on Pinterest!


What color blue did you use for the stencil? (Flowers)